![]()
Product Training
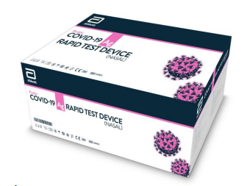
PanbioTM COVID-19 Ag Rapid Test Device (Nasal)
Training Presentation
This training presentation does not replace the Panbio COVID-19 Ag Rapid Test Device Instructions For Use (IFU)
Training Overview
During this session we will train you on the use of the Panbio COVID-19 Ag Rapid Test Device and cover the following:
- Intended Use
- Test Principle
- Kit Components
- Storage & Stability
- Test Procedure
- Test Interpretation
- Video Demonstration
- Quality Control
- Supporting Documents
- Technical Support contact details
- Key Takeaways
- Quiz Assessment
Intended Use
- The Panbio COVID-19 Ag Rapid Test Device is an in vitro diagnostic rapid test for the qualitative detection of SARS-CoV-2 antigen (Ag) in human nasal swab specimens from individuals who meet COVID-19 clinical and/or epidemiological criteria.
- It is intended to be used as an aid in the diagnosis of SARS-CoV-2 infection.
- The product may be used in any laboratory and non-laboratory environment that meets the requirements specified in the Instructions for Use and local regulation.
- The test provides preliminary test results. Negative results don't preclude SARS-CoV-2 infection and they cannot be used as the sole basis for treatment or other management decisions.
- Negative results must be combined with clinical observations, patient history, and epidemiological information.
For more information, please refer to the IFU.
Test Principle
- Lateral flow test
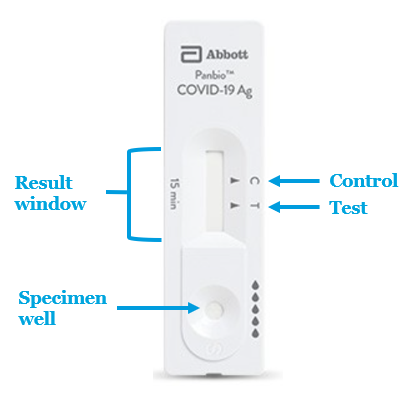
- When the test device is removed from the foil pouch neither the test line nor the control line are visible in the result window
- The patient sample is added to the Specimen well and then the sample migrates along the test strip
- If the COVID-19 Ag is present it will bind to the antibody complex at the test line in the result window and colour will form
- A visible control line is required to indicate a test result is valid
For more technical information, please refer to the IFU.
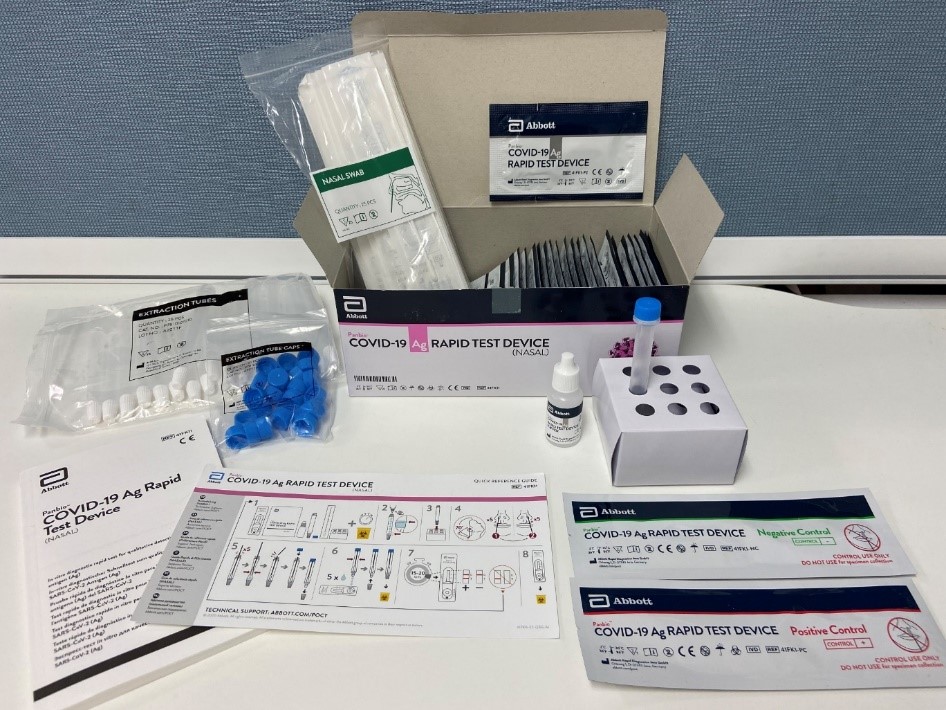
Kit Components
- 25 x Test devices with desiccant in individual foil pouch
- 1 x bottle of Buffer (9 ml)
- 25 x Extraction tubes
- 25 x Extraction tube caps
- 1 x Positive control swab
- 1 x Negative control swab
- 25 x Sterilized nasal swabs for sample collection
- 1 x Tube rack
- 1 x Quick reference guide (Nasal)
- 1 x Instructions for use
Materials Required but not provided
- Personal Protective Equipment per local recommendations
- Timer
- Biohazard disposal container
Storage & Stability
- The test kit should be stored at a temperature between 2-30°C. Do not freeze the kit or its components.
Note: If stored in a refrigerator, all kit components must be brought to room temperature (15-30 °C) for a minimum of 30 minutes prior to performing the test. Do not open the pouch while components come to room temperature. - The Buffer bottle may be opened and resealed for each assay. The Buffer cap should be firmly sealed between each use. The Buffer is stable until expiration date if kept at 2-30 °C.
- Perform the test immediately after removing the test device from the foil pouch.
- Do not use the test kit beyond its expiration date.
- Do not use the test kit if the pouch is damaged or the seal is broken.
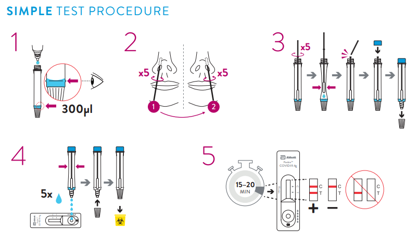
Test Procedure
Nasal swab specimens
- Note: Staff performing the test should comply with local guidelines including the use of personal protective equipment.

Test preparation
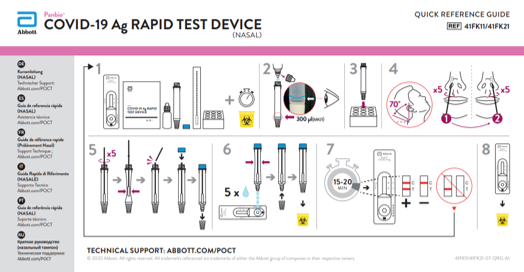
- Allow all kit components to reach a temperature between 15-30°C prior to testing for 30 minutes.
- Remove the test device from the foil pouch prior to use. Place on a flat, horizontal and clean surface.
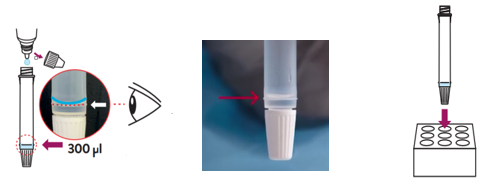
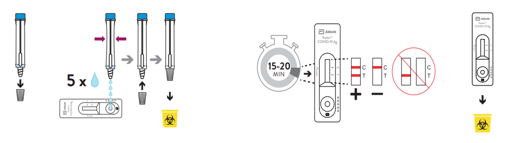
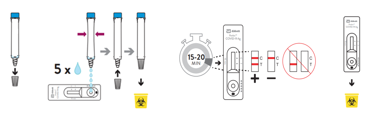
- Hold the buffer bottle vertically and fill the extraction tube with buffer fluid up to the fill-line of the extraction tube, this is 300μl or 0.3ml.
⚠ Caution: If the amount of buffer is too much or too little an incorrect test result may occur. The buffer amount supplied may run out if the tubes are filled above the line. - Place the extraction tube in the tube rack.
Specimen collection
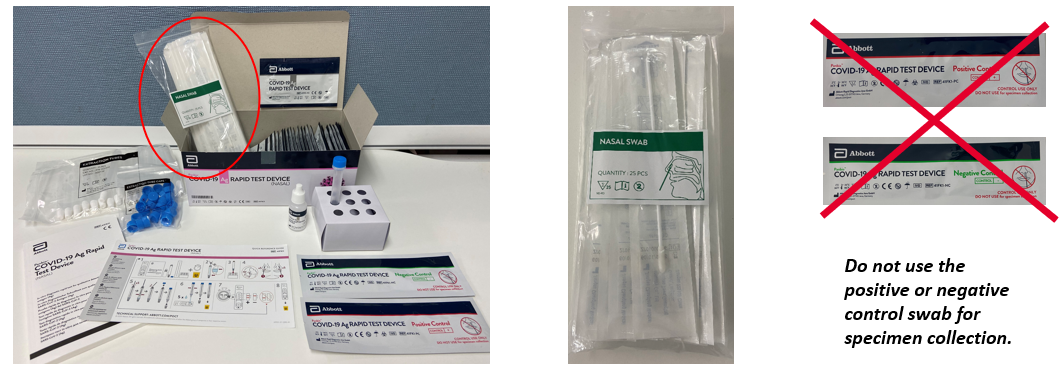
- ⚠ Caution: Use a dedicated nasal swab for specimen collection
NASAL Specimen collection
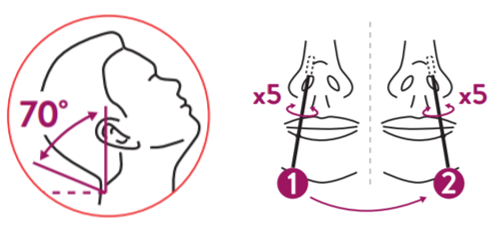
- Tilt the patient's head back 70°. While gently rotating the swab, insert the swab about 2cm into nostril (until resistance is met at the turbinates).
- Rotate the swab five times against the nasal wall then slowly remove from the nostril.
Using the same swab, repeat the collection procedure with the second nostril.
PATIENT SELF-COLLECTION METHOD
- Specimens are collected by the professional user as described in the previous slide.
- Alternatively, nasal specimen collection steps 1-3 can be completed by the patient according to oral instructions and under supervision of the professional user. For supervised patient self-collection, the swab is handed to the patient by the professional user and after sampling, the patient hands the swab back to the professional user to complete the remaining steps of the procedure.
EXTRACTION
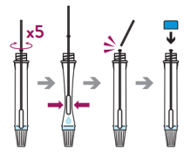
- Swirl the swab tip in the buffer fluid inside the extraction tube, pushing into the wall of the extraction tube at least five times and then squeeze out the swab by squeezing the extraction tube with your fingers.
- Break the swab at the breakpoint and close the cap of the extraction tube.
Note: Direct swab specimens should be tested immediately after collection. If immediate testing is not possible, the swab specimen can be kept in an extraction tube filled with extraction buffer (300μl) at room temperature (15-30°C) for up to two hours prior to testing.
REACTION WITH THE DEVICE
- Open the dropping nozzle cap at the bottom of the extraction tube.
- Dispense 5 drops of extracted specimens vertically into the specimen well (S) on the device. Do not handle or move the test device until the test is complete and ready for reading.
⚠ Caution: Bubbles that occur in the extraction tube can lead to inaccurate results. If you are unable to create sufficient drops, this may be caused by clogging in the dispensing nozzle. Shake the tube gently to release the blockage until you observe free drop formation. - Close the nozzle and dispose of the extraction tube containing the used swab according to your local regulations and biohazard waste disposal protocol.
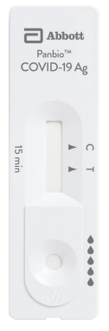
- Start timer. Read result at 15 minutes. Do not read results after 20 minutes.
- Dispose of the used device according to your local regulations and biohazard waste disposal protocol.
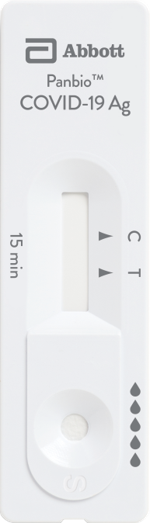
Test Interpretation
Positive result: The presence of the test line (T) and the control line (C) within the result window, regardless of which line appears first, indicates a positive result. ⚠ Caution: The presence of any test line (T), no matter how faint, indicates a positive result.
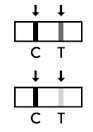
Negative result: The presence of only the control line (C) and no test line (T) within the result window indicates a negative result.

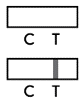
Invalid Result: If the control line (C) is not visible within the result window after performing the test, the result is considered invalid. Instructions may not have been followed correctly. It is recommended to read the IFU again before re-testing the specimen with a new test device.
Video Demonstration – Live Procedure
Quality Control
- Internal Quality Control:
The test device has a test line (T) and a control line (C) on the surface of the test device. Neither the test line nor the control line are visible in the result window before applying a specimen. The control line is used for procedural control and should always appear if the test procedure is performed properly, and the test reagents of the control line are working.
- External Quality Control:
Each box contains 1 x Positive Control Swab and 1 x Negative Control Swab, specifically formulated and manufactured to ensure performance of the Panbio COVID-19 Ag Rapid Test Device, and to verify the user's ability to properly perform the test and interpret the results.
–The Positive Control will produce a positive test result and has been manufactured to produce a visible test line (T)
–The Negative Control will produce a negative test result

⚠ Caution: Control use only. Do not use the positive or negative control swab for specimen collection.
- Good laboratory practice suggests the use of positive and negative controls to ensure that test reagents are working, and the test is correctly performed.
- Run the external controls under the following circumstances:
–With each new operator prior to performing testing on patient specimens,
–When receiving a new test shipment,
–At periodic intervals as dictated by local, state and country requirements, and/or by the user's Quality Control procedures
POSITIVE / NEGATIVE CONTROL SWAB
- Hold the buffer bottle vertically and fill the extraction tube with buffer fluid up to the fill-line of the extraction tube, this is 300μl or 0.3ml.
⚠ Caution: If the amount of buffer is too much or too little an incorrect test result may occur. - Place the extraction tube in the tube rack.
- Insert the positive or negative control swab in the buffer fluid inside of the extraction tube and soak the swab for 1 minute. Swirl the control swab tip in the buffer fluid inside of the extraction tube, pushing into the wall of the extraction tube at least 5 times and then squeeze out the swab by squeezing the extraction tube with your fingers.
- Dispose of the used control swab in accordance with your biohazard waste disposal protocol.
- Close the cap of the extraction tube.
- Follow the test procedure outlined in the video above.
Supporting Documents
QUICK REFERENCE GUIDE
INSTRUCTIONS FOR USE (IFU)
Technical Support
For questions regarding this training material please contact your trainer or Abbott Technical Support.
Abbott Technical Support - RAPID DIAGNOSTICS
Free call: 1800 622 642
Phone: (61 7) 3363 7100
Fax: (61 7) 3363 7167
Email: rapiddx.ANZ.enquiries@abbott.com
Technical Support Email: rapiddx.ANZ.techsupport@abbott.com
Website: www.abbott.com/poct
Key Takeaways
- The test kit is stored between 2-30oC
- Sample type is Nasal only
- You should run the test immediately after opening the foil pouch
- Fill the extraction tube with buffer fluid up to the fill-line of the extraction tube
- If the amount of buffer is too much or too little an incorrect test result may occur
- The test device, buffer and specimen should be at room temperature (15-30oC) before use
- You dispense 5 drops of extracted specimen into the test device Specimen well
- After adding the sample, you should read the result at 15 minutes
- DO NOT read the result after 20 minutes